
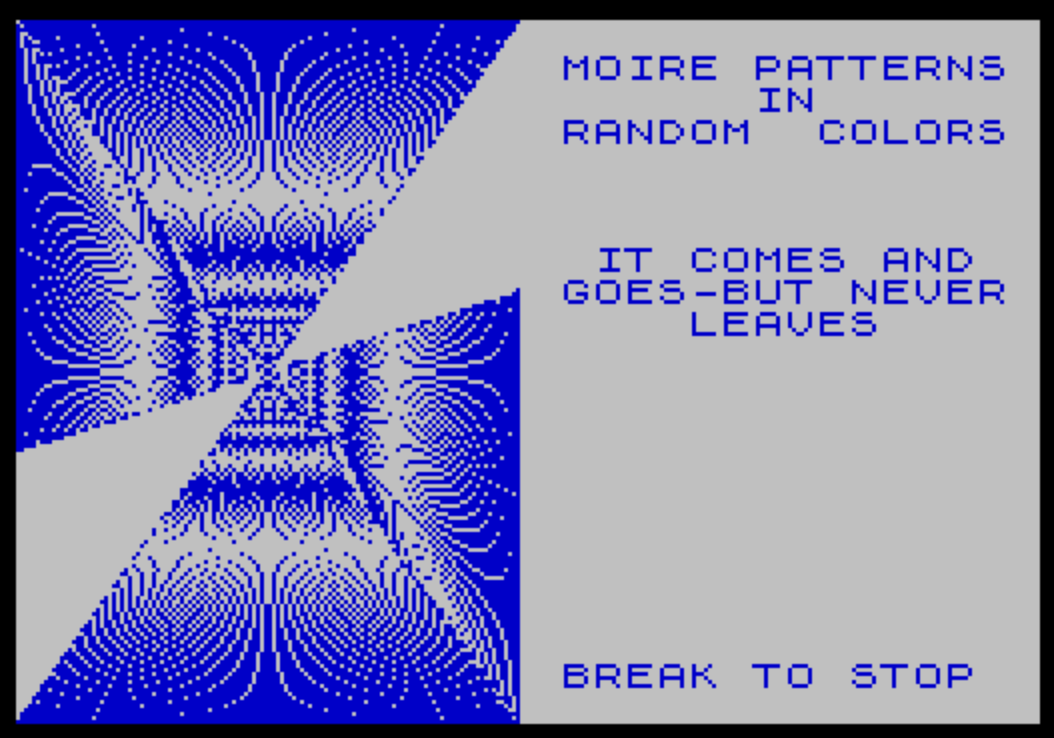
Moire Patterns draws geometric interference patterns on screen by connecting points along the edges of a rectangular frame with lines that cross through the center, creating the characteristic moiré illusion. Two FOR–NEXT loops drive the effect: the first iterates X from 0 to 125, plotting along the bottom edge and using DRAW OVER 1 to reach the opposite top edge; the second iterates Y from 0 to 175, plotting along the right edge and drawing back across. The OVER 1 attribute causes each pixel to be XORed with whatever is already on screen, which is essential to the crossing-line moiré effect. A randomly selected INK color is chosen at the start of each cycle via INK RND*7 with PAPER 9 (transparent), so the color scheme changes continuously. The program loops indefinitely via GO TO 40, regenerating the title screen and a fresh color each pass.
Program Structure
The program is organized into three logical phases separated by REM comments. Lines 10–20 are extended documentation REMs explaining the mathematical concept and controls. Lines 30–130 handle the introduction screen, displaying a title and brief description before pausing for approximately two seconds. Lines 140–260 form the main drawing loop, with GO TO 40 at line 260 creating a continuous cycle that redraws the title and then regenerates the pattern in a new color.
Drawing Algorithm
The moiré effect is produced by two FOR–NEXT loops that together cover all four sides of a 125×175-pixel frame:
- Lines 170–200:
FOR X=0 TO 125— plots a point at(X, 0)on the bottom edge and draws to(125-X*2, 175)on the top edge, so each line’s horizontal destination is the mirror of its origin. - Lines 210–240:
FOR Y=0 TO 175— plots a point at(125, Y)on the right edge and draws to(-125, 175-Y*2), mirroring vertically back across to the left edge.
The displacement arithmetic ensures each line passes close to the center of the rectangle. As successive lines accumulate, their intersections create the characteristic moiré mesh.
OVER 1 / XOR Rendering
Both DRAW statements use OVER 1, which applies XOR logic to every pixel plotted. This means pixels in areas of dense line intersection are toggled on and off repeatedly, naturally producing the light and dark bands of the moiré pattern without any explicit collision-detection or erase code. It also means the frame gradually self-erases in regions where lines overlap exactly, adding to the visual complexity.
Color Randomization
Line 50 sets INK RND*7 before each full redraw cycle, selecting one of seven colors at random. PAPER 9 is used as a transparent paper attribute, so the ink color applies to drawn lines against the existing background. Because the GO TO loop returns to line 40 (CLS and BORDER 0) each time, the screen is cleared and a fresh color is chosen, giving the continuous appearance of the pattern shifting in hue.
Notable Anomalies and Comments
Line 160 is present in the listing but appears to contain no executable statement — it is an empty line used as a visual separator between the REM block and the drawing loops, which is harmless. Line 270 contains LIST :STOP, a common idiom to present a clean listing view when the program terminates abnormally. The REM at line 150 explicitly documents the adjustable parameters (frame dimensions 125×175, rotation factor, line count, and screen position), providing useful guidance for experimentation without altering program logic. The REM spells “PATTERS” instead of “PATTERNS” and “CONTINOUS” instead of “CONTINUOUS” — minor typographic errors in the documentation only.
Key Variables
| Variable | Role |
|---|---|
X | Horizontal step counter for bottom/top edge lines (0–125) |
Y | Vertical step counter for left/right edge lines (0–175) |
Image Gallery
Source Code
  10 REM \{6}S&S\{6}\{6}\{6}BY PETER JENNINGS,FROM A THEME  SUGGESTED IN A PROGRAM BY JEREMYRUSTON. MOIRE PATTERS ARE FORMEDBY JOINING POINTS ON OPPOSITE   SIDES OF A FRAME WITH LINES THATPASS THROUGH THE CENTER OF THE  ENCLOSURE. THE PROGRAM USES PLOTAND DRAW, WITHOVER SET TO      CREATE THE PATTERNS. THE COLORS ARE SELECTED AT RANDOM IN A     CONTINOUS LOOP TO ADD INTEREST.
  20 REM THE PROGRAM RUNS CONT-      INUOUSLY BUT CAN BE STOPPED     WITH BREAK.
  30 REM INTRODUCTION AND SET-UP
  40 CLS :BORDER 0
  50 INK RND*7:PAPER 9
  60 PRINT AT 1,17;"MOIRE PATTERNS"
  70 PRINT AT 2,17;"      IN      "
  80 PRINT AT 3,17;"RANDOM  COLORS"
  90 PRINT AT 7,17;" IT COMES AND "
 100 PRINT AT 8,17;"GOES-BUT NEVER"
 110 PRINT AT 9,17;"    LEAVES    "
 120 PRINT AT 20,17;"BREAK TO STOP"
 130 PAUSE 120
 140 REM MAIN PROGRAM
 150 REM \{6}\{6}\{6}\{6}FRAME SIZE PLOTTED HERE IS\{6}125(X) BY 175(Y) THIS CAN BE\{6}VARIED, SO CAN THE ROTATION AND THE NUMBER OF LINES DRAWN\{6}(BOTH FOUND IN EACH OF LINES 160 AND 200). THE POSITION ON THE  SCREEN IS SET BY LINES 190/230. IF YOU MOVE THE LOCATION\{6}REMEMBER TO ADJUST THE VALUES OFX AND Y TO SUIT. EXPERIMENT!
 160
 170 FOR X=0 TO 125
 180 PLOT X,0
 190 DRAW OVER 1;125-X*2,175
 200 NEXT X
 210 FOR Y=0 TO 175
 220 PLOT 125,Y
 230 DRAW OVER 1;-125,175-Y*2
 240 NEXT Y
 250 PAUSE 120
 260 GO TO 40
 270 LIST :STOP
 280 SAVE "SS" LINE 270
Note: Type-in program listings on this website use ZMAKEBAS notation for graphics characters.